Maintain Customers in Namtek’s Accounting & ERP Software Solution [How To]

Last Updated on September 12, 2023 by Tatyana Vandich
NAMTEK’s fully integrated business software suite, erpWizard, has all the necessary sections for any company. In today’s blog we will take an inside look at the Customers Maintenance section, which can be found in the Sales and Distribution menu under Sales Processing, Master Tables OR in the Accounting menu under Accounts Receivable, Master Tables.
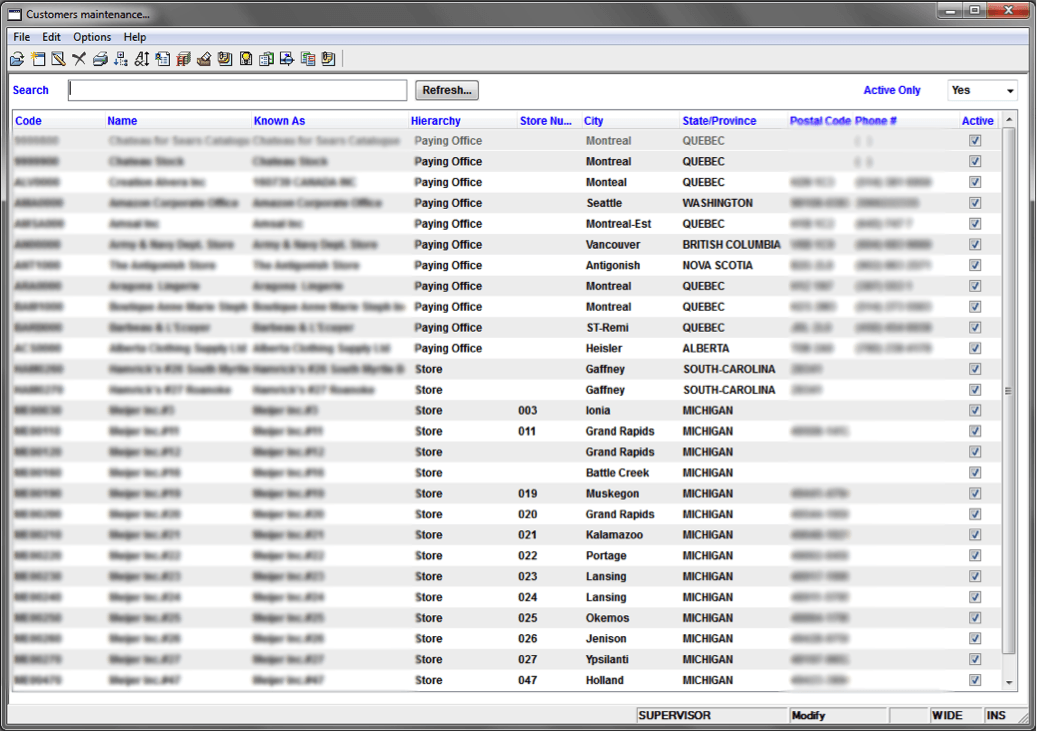
By default only Active customers will be shown. However, to see ALL customers, select No from the Active Only dropdown list. We have also made searching for a customer very simple – you can search by Name, Code, Store Number or City. Once you’ve found the customer you are looking for, you can right-click on that customer in the grid to see the following menu:
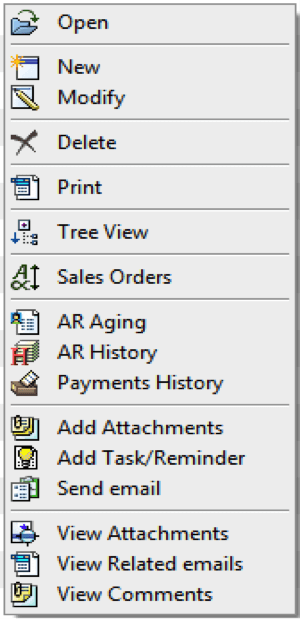
- Tree View: This option allows you to see the Hierarchy of the Customer (Head Office, Distribution Centers, and Stores)
- Sales Orders: This option allows you to see the list of Sales Orders for the selected Customer. If the selected customer is a Head Office then you will see ALL of the sales orders for ALL of the Stores belonging to that Head Office. If the selected customer is a Store than you will see only the orders belonging to that Store.
- AR Aging: This option will open the AR Aging screen for Head Office of the selected Customer.
- AR History: This option will open the Invoice History Screen for the selected Customer. Select the Company from the dropdown list and enter the Invoice Date From and Date To
- Payment History: This option will open the Payments History screen for the Head Office of the selected customer, which you can then enter the Date From and Date To.
Create/Modify Customer Screen
The following image is a screenshot of the New Customer section and its related tabs, in order to create or modify a Customer’s information.
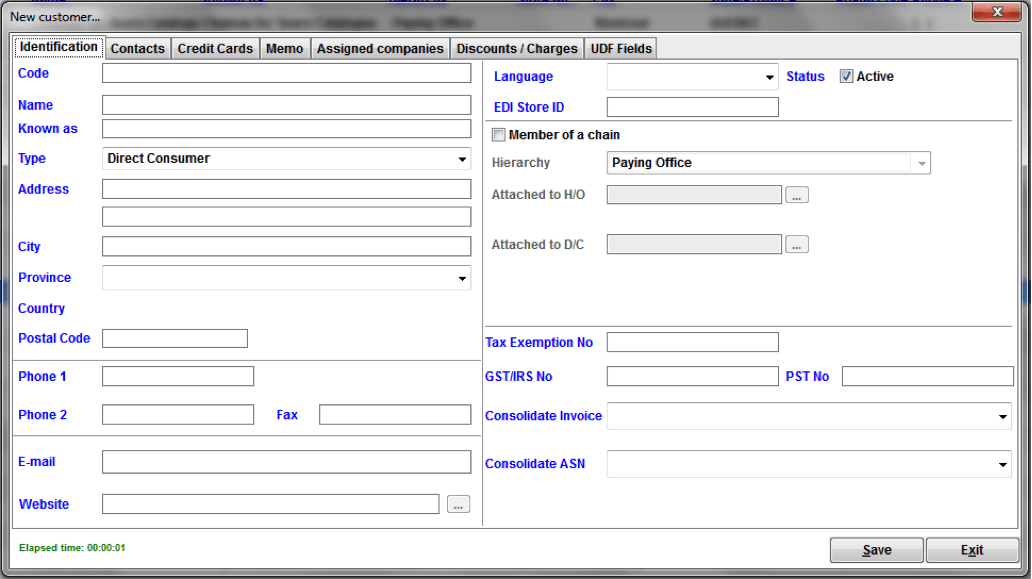
Identification Tab
The Identification Tab allows you to input the necessary information in order to properly identify the Customer. You are able to enter a Unique Code, Name, Type of Customer, Address, Contact Information (phone, email, website), Language, Customer’s Status, EDI Store ID (if there is one), etc.
If the customer is part of a chain, then click on the Member of a Chain checkbox. You can then select the Hierarchy of the customer from the dropdown list.
- Paying Office
- The Attached to H/O and Attached to D/C will automatically be filled in with the Customer Code.
- Distribution Center
- Enter the Attached to H/O code
- The Attached to D/C will automatically be filled in with the Customer Code.
- Store
- Enter the Attached to H/O code
- Enter the Attached to D/C code
Contacts Tab
In this section, you can enter the Contact Name, Position, Phone #s, Email address, Language and any additional information or notes related to the contact in the Memo field.
Credit Cards Tab
Memo Tab
This tab is useful for users that need to attach specific notes to their Customers.
Assigned Companies Tab
Under the Assigned Companies tab, you will find 3 subsections – Terms, Defaults and Memo. The Terms tab allows you to enter the Payment Terms, Freight Terms, Ship Via Codes, Credit Limit of Customer, Min or Max Order Amounts (optional), Ship. Priority (from 1 to 10) and default sales order Filling Rate %.
The Defaults tab allows you to select the following options by clicking on the appropriate checkbox(es):
- Accept B/O if the customer will accept back orders
- Discount on net if the customer gets a discount on the net order amount
- Always check credit if the customer’s credit should be verified at order entry
- PO Required if the customer must supply a Purchase Order number for every sales order
- Print Packing Slip? if the customer requires a packing slip with their orders
- Select the Packing Slip Type from the dropdown list.
- Print MH10 Label if the customer requires MH10 labels on the boxes
- Select the MH10 Label type from the dropdown list
– Set the Shipping Doc. option to Yes if the customer requires shipping documents
– Set the Invoice to Store option to Yes if the invoice is to be generated for the Store and NOT the Head Office
– Select the Print Invoice Type from the dropdown list
– Set the Print Statement to Yes if the customer requires statements
– Select the Default Currency from the dropdown list
– Select the Box Distribution Type from the dropdown list
– Select the Default Warehouse (ship from warehouse) from the dropdown list
Lastly, the Memo tab allows you to enter any notes relating to the customer and selected company.
Discounts/Charges Tab
To enter discounts or charges for the selected Customer, you can enter the Discount/Charge Code, which is attached to the description of that selected code (by default unless you change it) and then enter the Discount/Charge %. Click on the Active checkbox to set the discount/charge code as active or inactive.
UDF Fields Tab
This tab allows you to enter the UDF Value for any of the User Defined Fields that have been setup by your system administrator.
Maintaining Customers in erpWizard is easy and practical. ErpWizard allows employees to work efficiently by inputting data in one fully integrated system for the whole company to easily access. To view a live demo of our accounting and ERP software solution, click here.
Stay tuned for more descriptions of erpWizard in future blogs…