Set up EDI mapping for Outgoing EDI transactions (3/3) [How To]
Last Updated on December 13, 2022 by Tatyana Vandich
Today’s erpWizard guide is the third and last section of our EDI series. It is a continuation of part 2, which further explains setting up EDI mapping for outgoing documents and translations. To refresh your memory on the previous section, please read Setting up EDI mapping for Incoming EDI transactions (2 of 3).
OUTGOING
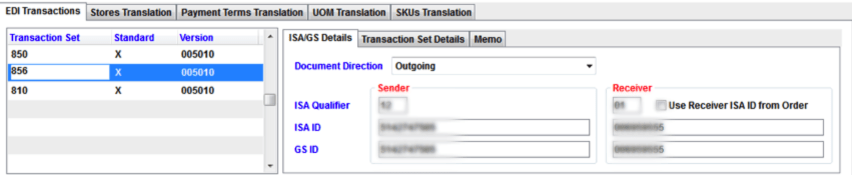
Segments and Elements for OUTGOING documents
The creation of Outgoing Segments and Elements is based on the EDI Document specs, but also on each EDI Partner requirements. The list is therefore not exhaustive, but Segments and Elements can be added at any moment, on demand, or if the specs changed.
Notes:
- Elements are always attached to a Segment
- Even though an Element is selected, it will NOT be included in the EDI Document id the Segment it belongs to is NOT selected
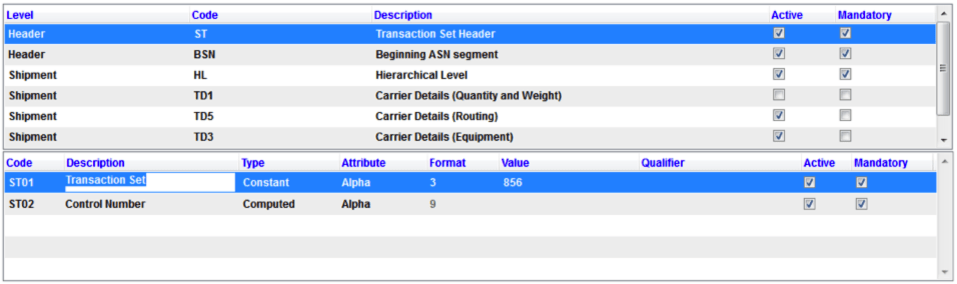
The available columns for the Segments are:
- Level (not modifiable): Indicates the level of the Segment in the EDI Document (Header, Detail, Summary…).
- Code (not modifiable): Indicates the Code of the Segment in the EDI Document.
- Description: Indicates the Description of the Segment in the EDI Document.
- Active* (not modifiable for “system-type” Segments): Indicates if the Segment will be included in the EDI Document.
- Mandatory* (Not modifiable for “system-type” Segments): If the Segment is “Active”, indicates if it MUST be included in the EDI Document.
The available columns for the Elements are:
-
Code (not modifiable): Indicates the Code of the Element in the EDI Document.
-
Description: Indicates the Description of the Segment in the EDI Document.
-
Type* (not modifiable for “system-type” Elements): Indicates the way the value for this Element has to be written into the EDI Document. Available values are:Attribute*: Indicates the format for the Elements (Alpha, Numeric, Date, or Time)
- Computed: The value will be generated/calculated by the system. The user cannot change it, or even specify any value or qualifier.
- Constant: The value is defined by the user in the “Value” field.
- Data: The value is defined by the user in the “Qualifier” field. The Qualifier has to be selected among the list of available qualifiers for this Element.
-
Format (not available for “Computed-type” Elements): Based on the selected Attribute, the user can enter the length/format of the Element when written in the EDI Document.
-
Value (not available for “Computed-type” or “Data-type” Elements): Applies only to “Constant-type” Elements. The user can enter in this field any value. This value will be written in the EDI Document for this Element.
-
Qualifier (not available for “Computed-type” or “Constant-type” Elements): Applies only to “Data-type” Elements. The user can select in this field any available Qualifier. This value will be written in the EDI Document for this Element. The Qualifier will indicate to the system where to find (Which table? Which Field?) the value that has to be written in the EDI Document.
-
Active* (not modifiable for “system-type” Elements): Indicates if the Element will be included in the EDI Document (REMINDER: Its Segment MUST be selected as well)
-
Mandatory* (not modifiable for “system-type” Elements): If the Element is “Active”, indicates if it MUST be included in the EDI Document.
Stores Translation

This tab displays the list of EDI Store translations, as defined by the user.
For each Store defined in the system, the User can enter its translation in the column “EDI Store Code”. Then, he can indicate if that EDI Store is “Active” or not.
These translations will be used in the different EDI Documents.
Payment Terms Translation

This tab displays the list of EDI Payment Terms translations, as defined by the user.
For each Payment Term defined in the system, the User can enter its translation in the column “EDI Payment Term Code”. Then, he can indicate if that EDI Term is “Active” or not.
These translations will be used in the different EDI Documents.
UOM Translation
This tab displays the list of EDI UOM translations, as defined by the user.
For each UOM defined in the system, the User can enter its translation in the column “EDI UOM Code”. Then, he can indicate if that EDI UOM is “Active” or not.
These translations will be used in the different EDI Documents.

SKUs Translation
This tab displays the list of EDI SKUs translations, as defined by the user.
For each SKU defined in the system, the User can enter its translation in the columns “EDI SKU Code”, “EDI SKU Description”, “EDI Color”, “EDI Type” and “EDI Size”. Then, he can indicate if that EDI SKU is “Active” or not.
These translations will be used in the different EDI Documents.

Once the setup is complete, just press Save.
Hope you enjoyed learning about setting up EDI partners and EDI mapping in erpWizard. Our simple manual gives you a glimpse into our fully integrated software solution and allows you to better understand how user-friendly it really is. For a more visual presentation, get a LIVE Demo today!

(*) Please refer to your EDI documentation to find these values


Leave a Reply
Want to join the discussion?Feel free to contribute!