Manage a Company’s Bank Book & reconcile the Statement of Account in ErpWizard [How To]


Bank Book
Finding the right business software solution is tough. It is not the same as buying office supplies for your company. This process is much longer since more thought, research and training is involved. This is why our team at NAMTEK Consulting Services decided to give you a glimpse at our integrated business software solution, named ErpWizard, so we help make this process a little bit easier. Getting to know the different aspects, capabilities and sections found in this efficient and easy to use solution can give you a better understanding of how IT can help grow and simplify your business processes to be more efficient.
Today’s blog is a technical analysis and introduction to erpWizard’s Bank Book.
The Bank Book is a list of all the transactions from the system that have affected the bank account and it can be used to reconcile your bank’s statements. ErpWizard is simple and easy to use; this play-by-play will show you just that.
How the data is populated
Data in the Bank Book screen is automatically populated without any user intervention. Since erpWizard is a fully integrated software solution, all modules are in real-time interaction. Every time a G/L transaction is created in erpWizard, regardless of its source (either from the Payables, Receivables or G/L module), a transaction in the Bank Book will be generated as soon as the G/L account affected is linked to a bank account in the system.
In short, updating Payables, Receivables and G/L will automatically populate the data in the Bank Book.
How It Works
To access the Bank Book form (or screen) in ErpWizard, the user simply needs to select Bank Book option from the menu. This can be found in the Accounting menu under General Ledger, Entries and Processing. You can run the program by either double-clicking on it or by right-clicking and selecting Run Program.
Our software solution is full of drop-down lists, check boxes, right-clicking options, etc. to allow the user to find what he/she is looking for easily and quickly. Selecting and inputting data has also been simplified, as there are many ways to do one task, such as manual input, pressing F keys or clicking buttons. Whichever method the user prefers, it will be available to him/her.
Once the Bank Book program is running, you can find the Company Code and the Bank Account in drop-down lists. By default, all of the Bank Book transactions that occur in a specific period (or fiscal period) will be listed. If you would like to see the transactions for a specific statement date, then select the Filter by Statement option by clicking the check-box and entering the date of the statement you wish to view by either typing it, pressing the F5 key and selecting the date from the calendar or by clicking the button after the date to select it from the calendar.
- Filter by Company: This filter is available in most of erpWizard screens, since it supports running multiple companies from within the same studio
- Filter by Bank Account: This filter allows a user to range only on activities and transactions related to a specific bank account. ErpWizard supports multiple bank accounts.
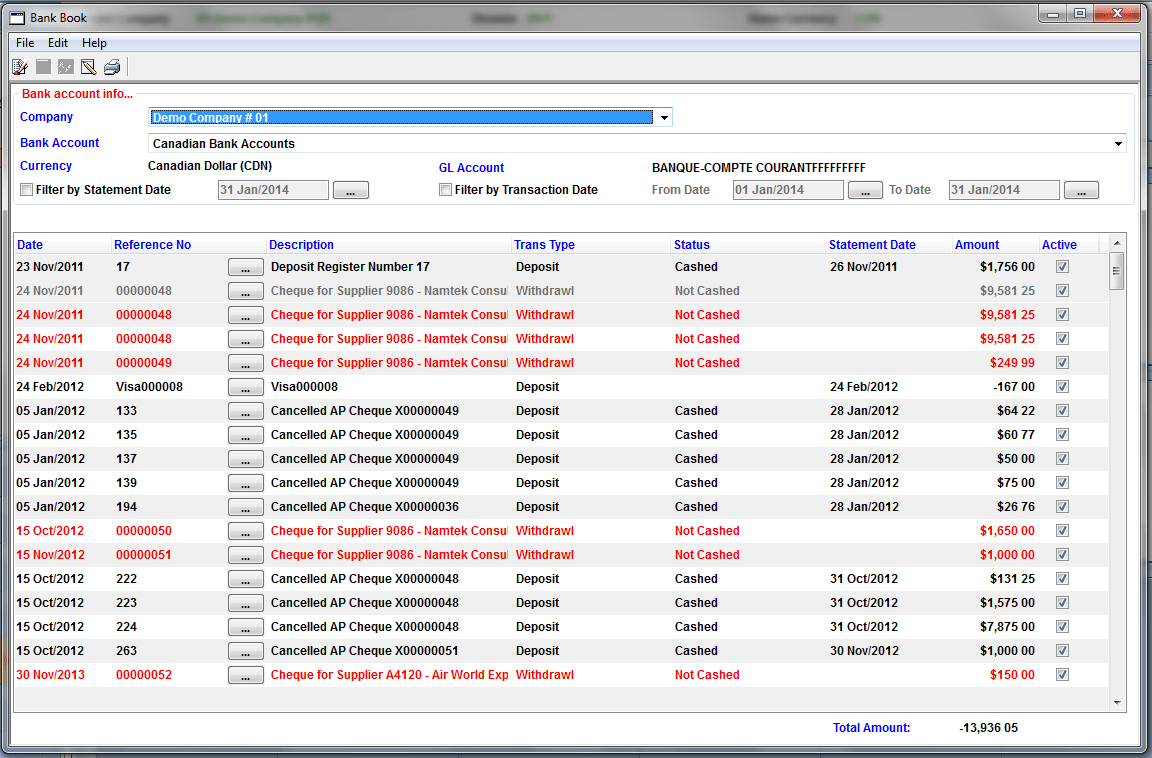
Once you can view the specific transactions you are looking for, you can then right-click in the grid to see the following menu:
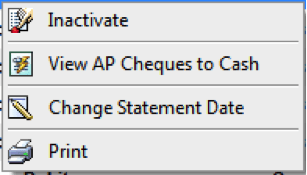
- Inactivate: This option will allow you to exclude the transaction from the bank statement. If a transaction is Inactive, then this menu option will be Activate.
- View AP Cheques to Cash: This will show you a window with the list of the AP Cheques that have not yet been cashed. (See below for a sample).
- Change Statement Date: This feature allows you to change the Statement date of the transaction. (See below for a sample).
- Print: This option will print the list of transactions for the selected bank account, for the selected statement date or for the selected transaction date from/to. The output is a document in PDF format.
View AP Cheques to Cash
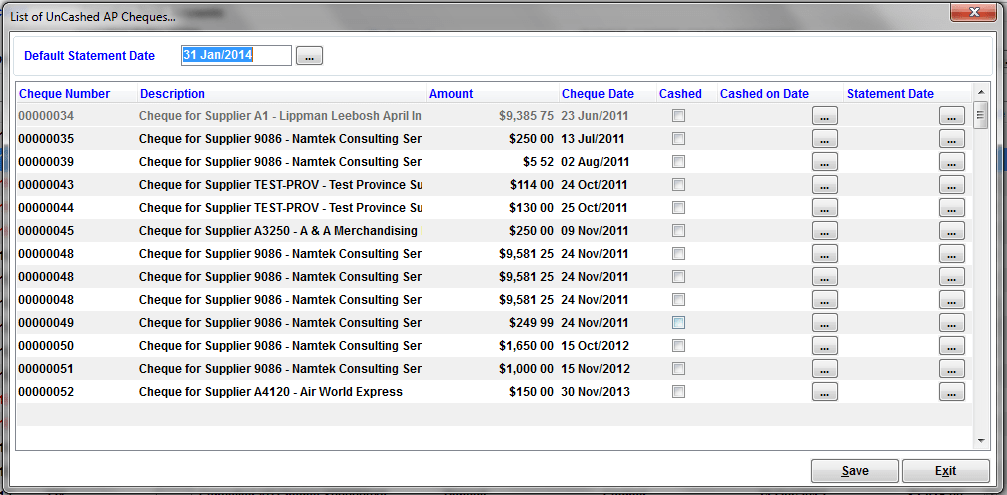
For the cheques to mark as Cashed, select the Default Statement Date by typing it manually, pressing the F5 key and selecting the date from the calendar or by clicking the button after the date to select it from the calendar. By simply pressing <ENTER>, the cheque will be marked as cashed. The Cashed on Date and Statement Date will automatically be entered; however they can be modified by typing it manually, pressing the F5 key and selecting the date from the calendar or by clicking the button after the date to select it from the calendar.
Change Statement Date
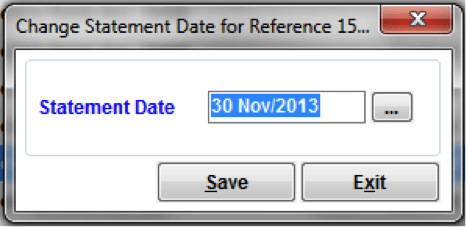
Sometimes, you need to change the statement date of a transaction from its default value, in order to reflect the correct statement date logged by the bank. Above, we have a screenshot of the screen where we can change the Statement Date. To change this date is simple; type it in, press the F5 key and select the date from the calendar or click the button after the date to select it from the calendar. Click the Save button to save your changes or Exit to close the screen with unsaved changes.
We have shown you at a quick glance how erpWizard allows a company to manage its Bank Book. There are many other sections and departments, all fully integrated, with the necessary business features and easy to use capabilities. Stay tuned for a glimpse at the next erpWizard section…


Leave a Reply
Want to join the discussion?Feel free to contribute!